
Before you go for installation of vehicle GPS tracker to your vehicle it is very important to go through and understand about the Caution and Few facts for GPS tracker attached with the manual. connectmyworld is a Vehicle GPS Tracker that connects to your car and provides you with real-time information about your vehicle’s location, speed, and other data. The connectmyworld employee gps tracker is a small, unobtrusive device that attaches to your car’s dashboard or windshield. It uses GPS to track your car’s location and transmits this information to connectmyworld’s servers. You can then access this data from any internet-connected device, including your smartphone, tablet, or laptop. The connectmyworld tracker is an easy way to keep track of your car’s location and speed, and it can be a valuable tool for fleet managers, parents, or anyone who wants to track their vehicle’s whereabouts.we are also a employee tracking app and data collection app GPS signal are able to pass through from sky to device via fiber, plastic, glass, cloths, cotton, leather, wood etc…but having difficulty to pass through any type or thickness of metal and concrete. While installation of GPS tracker there are few very important points need to consider very carefully.
- Install the unit where it must not get the direct sunlight at any point of time.
- GPS unit must not cover or protected by metal(even very thin) by doing so GPS signal will not be able to reach to the unit directly from the sky.
- Make sure that unit is not kept at any place which is overheated or over cooled.
- Always keep the unit into the pouch provided to protect it from dust or any type of liquid fall.
- Also keep the unit at safe place where it cannot be easily stolen.
There are few below suggested positions for Vehicle tracker can be installed. In four wheeler, if the dashboard is made of fiber you can try putting tracker device into the lock box as the most preferred position.If the dash board is not made of fiber the second preferred position could be under the steering. 
 In two wheeler the suggested position is either into the tool box in case of bikes or under the front cover in case of scooty. Here the point to be noted that tool-box cover of the bike and front cover of the scooty is made of fiber and not of the metal. And if it is made of metal you need find out any other suitable position where the GPS signal can be reached.
 Vehicle Tracker Charger is exposing 2 wires: 1. Red wire: it is coming out of fuse and requires to connect with one of ignition switch wire. 2. Blue wire: It is directly coming out of charger and is used for earthing.
What is ignition switch?
 This is the switch usually found below the steering in 4 wheeler and also found below the head lights in 2 wheeler. This switch is responsible to provide the power to various artifacts like head light, horn, back light etc when the ignition is on . Tracker will also take the power from same ignition switch. In any vehicle whether 4 wheeler or 2 wheeler the switch will look like as shown the bunch of colorful wire coming out of it.
  Ideally any one of these colorful wire can be skinned and tracker red wire can be attached to it. But it is worth to check if for any reason the selected wire is not active when ignition put on. This can be achieved through testing bulb by attaching the one wire of the bulb to one of the available switch socket and other through earthing. Once the ignition is on the bulb should glow it means the selected wire is working as expected.
  It is the time to skin the wire as shown in the picture and attach red wire to it.
 and attach the tracker blue wire to the earthing. Now pickup the tracker and connect the USB port to the tracker as shown in the figure.after that when the ignition is on first tracker will glow and after some time light will start flashing.

 Once the power is acquired by tracker, means everything is fine and take the USB out from the tracker and take the tracker to the desired location where you finally want to keep it as already suggested about the preferred location. But before doing any thing it is good idea to tie up the tracker USB charger wire side with the existing wires and this really helps and reducing the changes of losing the connection.

 Do the final preparation of installing tracker as first into the pouch supplied with tracker and take the sticker out and put it in one of the desired location. It is suggested taking the sticker part out and sticking the tracker can be done later once you have tested for couple of days and tracker is able to receive the GPS signal and work as expected without any surprises. Otherwise you might require to change the position of the tracker. It could be any of the location as below: For 4 wheeler as suggested in the picture as shown below.
  Also for 2 wheeler it could be tool box of the Bike or the front cover for the Scooty.
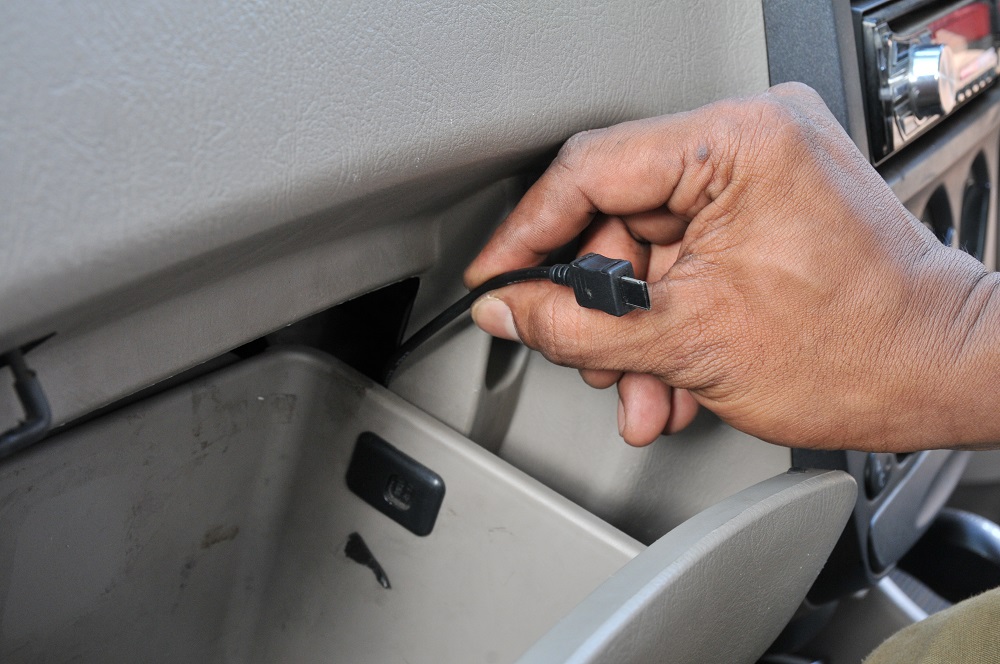
  Now take the tracker USB charger (as below explained in the picture) wire from ignition switch to the location where the tracker is kept and finally attaching the male-female wire of the tracker.
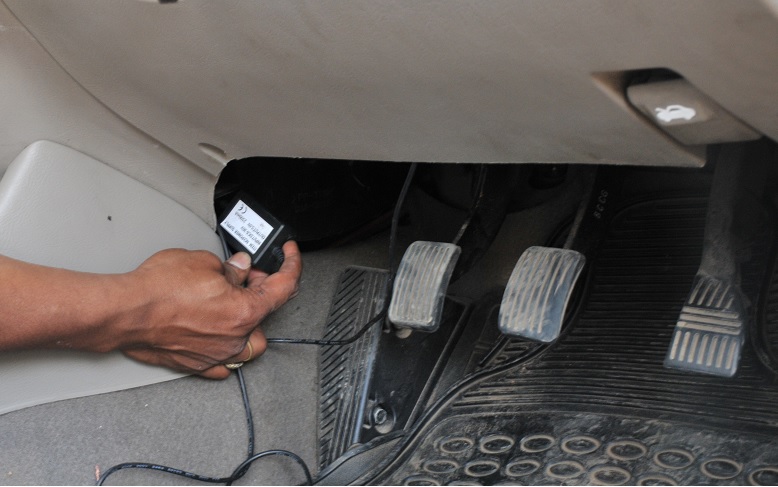
 This way the vehicle tracker is installed to your vehicle and ready to use!!!!! [printfriendly]